


In this tutorial, you will have an in-depth understanding of how to add authentication to your app using Passport.js and how it works under the hood.
NOTE: If you are looking for a shortcuts, then this is not for you !!
But before getting to the topic, let us understand a few concepts and tools required for it :
Authentication
Authentication is a process that confirms the identity of a user. This is done by verifying the user's credentials, such as a username and password, or through biometric authentication.
Authorization:
Authorization is the process of determining if a user has access to a particular resource or action in the application, based on predefined rules and permissions.
Different types of authentication:
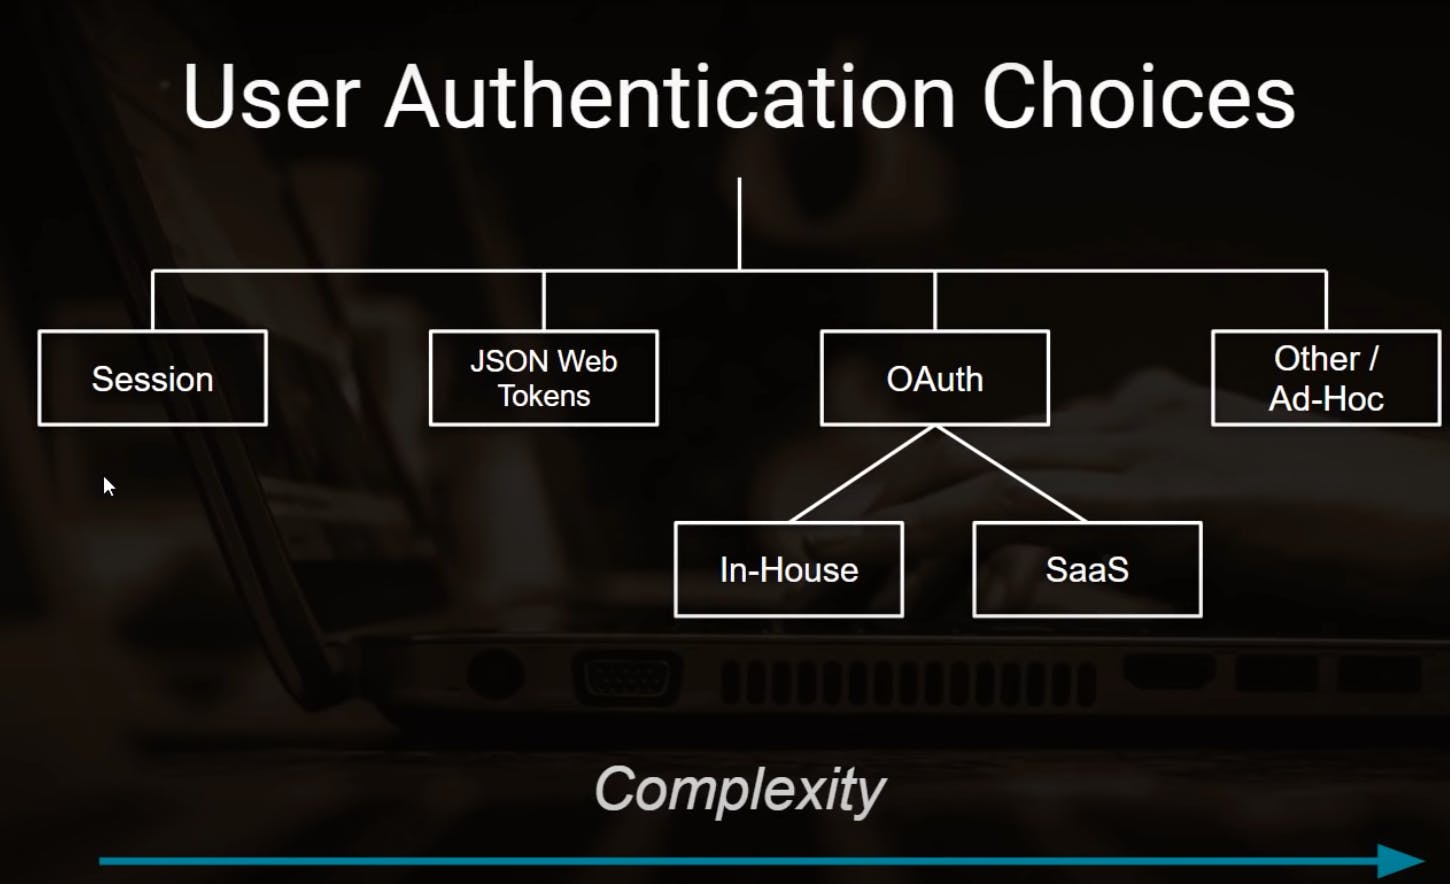
For this tutorial, we will be dealing with session-based authentication.
Session:
A session refers to a period of interaction between a user and a website.
HTTP is a stateless protocol, hence we need to manage our own sessions. Session data can include information such as user preferences, login credentials, items in a shopping cart, or any other relevant data that needs to be remembered during the user's interaction with the website.
They enable websites to remember user-specific information and provide a seamless browsing experience.
Cookies:
A cookie is a small text file that is stored on a user's device, put by a website. It contains information that the website can retrieve and read when the user visits the website again in the future.
When we visit a website for the first time, it sets a cookie in our browser using a Set-Cookie method in the response object.
You can see this in the network tab of your browser’s console.

And from then on, the browser sends the cookie along with any request it makes to the website, to share the data in it.
Uses of cookies:
Session management: Cookies are commonly used to manage user sessions. They allow websites to remember user login information and maintain user authentication, so users don't have to log in repeatedly during a single browsing session.
Personalization: Cookies enable websites to remember user preferences and settings, providing a personalized experience for each visitor.
Tracking and analytics: Websites use cookies to track user behavior, including the pages visited, the duration of the visit, and the actions taken by them.
Third-party Cookies: They help track users' interests and online activities, allowing advertisers to display relevant ads based on their preferences and behavior.
Note about auth: When the user first time visits a website, express-session creates a session and stores the id in the cookie, now all the information about the user, whether he is logged in or not, or any information, is stored in the session, and on every request the cookie sent by the browser tells the server, you are the same user. Hence using this the client remains authenticated. Delete the cookie or the session from the server side and you will have to re-login.
Express middleware:
A middleware is a function that executes after the server receives the request and before the controller action sends the response.
To know in detail check out my blog on express middlewares.
Express-session
Express Session is a middleware module for the Express framework. It provides a session management mechanism for storing and managing user session data.
It does the following things:
Session Management: Enables you to create and manage user sessions in your Express application. It generates a unique session identifier (session ID) for each user and stores it in a cookie.
Session Storage: Express Session allows you to choose different storage mechanisms for storing session data.
Session Configuration: Provides options to configure various aspects of session management, such as session duration, cookie settings, session ID generation, and more.
Session Data Access: Express Session provides a simple API to access and modify session data within your application.
To install express-session:
$ npm install express-session
To configure:
const express = require('express');
const session = require('express-session');
const app = express();

app.use(session({
  secret: 'your-secret-key',
  resave: false,
  saveUninitialized: true
}));
How session-based login works:
The following steps take place:
User Login: The user enters his credentials, which go to the server using the request object.
Server authentication: The server checks the credentials and if they are correct, the server creates a session ID, which is sent in the response and saved as a cookie in the client using the set-cookie function of the response object.
Session creation: The server creates a session object containing relevant information about the user, such as user ID, user role, and any other necessary data.
Subsequent Requests: With the session ID stored, every time the client makes a request to the server, it attaches the cookie to the requests. The server verifies the ID in the cookie, this is the reason we don't have to always keep on logging in while using a website.
Session expiry: If the user remains inactive, then the session expires to prevent sessions to last indefinitely. This is the reason when you visit a website after some time you have to re-login. Some websites can have a long session expiry time, and some can have a short one, such as banking websites.
Logout: When a user logs out the associated session data is deleted, and the session ID becomes invalid.
Passport.js
Passport is authentication middleware for Node.js. It has what is known as a Strategy for different authentication techniques. For session-based auth, we will use the passport-local strategy.
For folder structure and code reference, see the following code:
💡 NOTE: I will be skipping a few codes such as the login page, signUp page, route handling, etc. Hence refer to the code above.
To start, follow the following steps:
Install
In your terminal, get to the project directory and do the following:
$ npm install passport
$ npm install passport-local
Configure Passport local strategy
const passport = require('passport');
const LocalStrategy = require('passport-local');
// for getting access to the database
const { Users } = require('./database');
// a custom utility function to validate two passwords by comparing the hash
const  { validatePassword }  = require('../utils/passportUtils');
Setting up the strategy:
passport.use(new LocalStrategy(async function verify(username, password, callback) {
    try {
            // try to find the user from the database
      const user = await Users.findOne({ name: username });
      // if no user
      if (!user) { return callback(null, false) } // (no error, no user);
      // user found then validate password
      const isValid = validatePassword(password, user.salt, user.password);

      if (isValid) {
        // console.log("user found");
        return callback(null, user); // (no error, user)
      }
      else {
        // console.log("user not found");
        return callback(null, false);
      }
    }
    catch (e) {
      return callback(e);
    }
  }));
In route handling, do :
router.post('/login', passport.authenticate('local', {
    successRedirect: '/protected',
    failureRedirect:'/login'
}));
Also you need two functions to configure:
passport.serializeUser(function(user, cb) {
  process.nextTick(function() {
    cb(null, { id: user.id, username: user.username });
  });
});

passport.deserializeUser(function(user, cb) {
  process.nextTick(function() {
    return cb(null, user);
  });
});
Once authenticated, the request object will have a user field, having the user details. This will be done by the above functions.
Establishing a Session
You are not done yet, you need to set up session using express-session, so that the user can remain authenticated while moving in the app.
In the terminal:
$ npm install express-session
# for storing session-specific data in the Mongo database
$ npm install connect-mongo
Then:
const passport = require('passport');
const session = require('express-session');

app.use(session({
  secret: 'keyboard cat',
  resave: false,
  saveUninitialized: false,
  store: MongoStore.create( { mongoUrl:'mongodb://localhost:27017/learningPassport'})
}));
// setting passport session
app.use(passport.authenticate('session'));
For registering new users (signUp):
router.post('/signup',async (req,res)=>{
        // here i have used EJS for displaying the errors
        //if pass!=cnfrmpass
        if(req.body.password!==req.body.confirmPassword){
            return res.render('signup',{err:true,msg:"Password and Confirm Password do not match!"})
        }
        // if(user already exist)
        const user=await Users.find({name:req.body.username});
        if(user.length!=0){
            return res.render('signup',{err:true,msg:"User already exists! Try another name or Login if have an account. "})
        }

                // genPassword is a custom function to generate a hash from the function
                // as we will not be storing the password as plain text
        const passDetails= genPassword(req.body.password);
        const newUser=await Users.create({name:req.body.username, password:passDetails.hash, salt:passDetails.salt});
                // passport functionality
        // longin method is added to the req object my passport
        // if creates a user session and abstracts all these things for us
        req.login(newUser, function(err) {
            if (err) { return next(err); }
            res.redirect('/protected');
          });
    })
Finally, for logging out the user, in the route handling do:
router.post('/logout', function(req, res, next) {
  req.logout(function(err) {
    if (err) { return next(err); }
    res.redirect('/');
  });
});
Note:
We don't need to fully understand how these functions work, as they are defined inside the framework. PassportJs does a lot of things in the background, and all the heavy lifting for us.
Hence we need to refer to the docs: PassportJs docs, and just understand how to use them.
Conclusion
A lot of effort went into explaining the complex topic in an easy way. So if you found this valuable, then please like and share this blog.